Pages

Thursday, December 22, 2011

Made in America Christmas


Hi guys - welcome to the fourth and final installment of the Made in America Christmas Series.  I've really enjoyed searching out US manufactured products.  I think I will continue to periodically post about products made in the USA that I really like.

{ You can see my previous posts here:  week 1, week 2, week 3 }

Also, head on over to my sister's blog, A Little Ditty to see her Made in America Christmas post this week.

A few weeks ago I came across a company called Hickoree's Hard Goods.  They offer lots of made in the USA products.  Click here to see all their USA products.

I would love to have Santa bring me this Heritage Leather Co. Bag.  I love the simplicity of it.


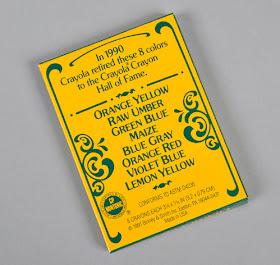
Also from Hickoree's, this awesome Collectors Set of Crayola Crayons.


The set includes a tin with 64 crayons and 8 retired colors.  Fun!


I know Crayolas are for kids, but I wouldn't mind these for myself!


Did you know that the Slinky is still made in the USA?  Yay Slinky!  Hickoree's offers this Collectors Edition which comes in packaging designed in the 1940s.  Pretty cool.


If you want to check out all the products Hickoree's offers from the USA, go right here.

Next up, Anchor Hocking. You've probably heard me talk about them before on the blog - they are a favorite of mine for their simple and functional glassware.  Most of their products are made in the USA.  I also really like that Anchor Hocking products are inexpensive, and readily available.  Target has a great selection.

Here are just a few of my favorites...

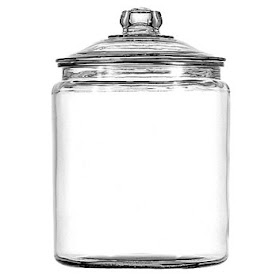
I have a few of these Heritage Hill Jars in my craft room.  The one gallon size is only $11.99.  You can use these jars in just about any room of your house.
Another favorite, the Apothecary Jars.  The medium size is only $4.99!
OK, this 44 oz. water pitcher is $5.99!  It would make a pretty vase too, don't you think?


I think every kitchen could use a set of these glass mixing bowls.  Another great value at $19.99.

Right now you can save 30% of your order at the Anchor Hocking Online Store by entering "endofyear" in your shopping cart.

Stop by A Little Ditty to see my sister's made in the USA pick this week.  She promises that she is participating this week - last week she had to skip because she had a crazy week at work!

Have a wonderful Christmas!

Wednesday, December 21, 2011

Handmade Holidays: Moravian Star Tutorial


After I posted my Christmas tree last week, I had a few requests for instructions on how to make the paper star.  I think it might be hard to write out, but here it goes...

Materials:
- 4 strips of paper; 3/4" wide by at least 20" long
- Thread or string to hang

You will find large sheets of paper in an art supply store or the art section at Michael's or Hobby Lobby.  I like to use a medium weight paper - not quite card stock but not regular copy paper.

I use a self-healing mat, straightedge, and rotary cutter to cut the strips of paper.


1.  Cut both ends of paper strips like those in photo below.


2.  Fold each strip, not quite in half, but almost.  See photo below.


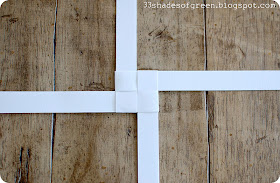
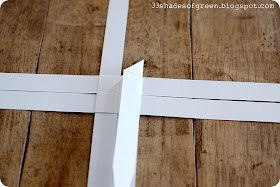
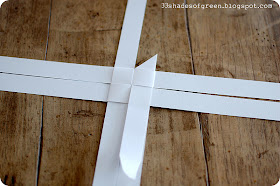
3.  Assemble strips in basket-weave pattern as shown in photo.


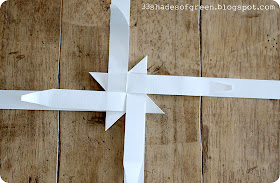
4.  Here's another photo from a different view.  See how the strips are entwined?


5.  Pull tight so strips of paper look like this:


6.  We are going to make a second basket-weave with our paper strips.  Take one of the paper strips at top and fold over.


So that your paper looks like this:


7.  Now take one strip on the left and fold over to the right.  Like this:


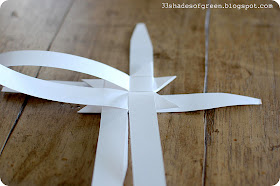
8.  Repeat with the strip on the bottom, and then the last one on the right.  For the last strip we need to finish off the basket-weave.  Do this by inserting it under the other strips.  See photo below:


9.  So now, your paper strips look like this:


10.  Now we are going to start making the points of the stars.  Fold strip on upper right hand corner to look like photo below:


11.  Now fold that strip straight down to look like this:


12.  Fold the entire strip over to the left.  Like this:


13.  Now fold strip under.  See photo below:


14.  Now your paper strips will look like this:


15.  Turn your paper strips counter-clockwise and repeat:


16.  Repeat with remaining two sides and your paper strips should look like this:


17.  Turn over and repeat with four remaining strips on back side.

18.  Fold strips so they look like those in photos below:


19. Now we are going to fold the 3D points of the star.  I think this part is the most difficult to explain - I hope the photos will help make sense of it!

Hold paper in your hand and fold strip like shown in photo below:


20.  Twist paper strip until it looks like photo below and insert under fold on the left.


21.  Use your thumb to help form the point while pulling strip on left hand side.  Pull tight, but not too tight until point is formed correctly.  This takes some practice!


22.  Turn star clockwise and repeat.

23.  Repeat until all four points are complete.
 

24.  Turn over and repeat until the other four points are created.  The folding is done - your star should look like this:
 
{ Yikes, don't mind my dry, ugly hands.  I had worked on a little project involving a saw and sandpaper earlier in the day, so that's my excuse! }
 
25.  Now you need to trim the ends of the paper strips.  carefully pull the strips tight and trim, careful not to cut your any folds on the star.
 

Your star is finished!  Use a needle and thread to attach a loop for hanging.


I made this green star a few years ago by using wrapping paper.  The paper was green on one side but white on the other so I use spray adhesive to adhere two two sheets of paper and then cut into strips.


Good luck - I really hope this tutorial makes sense!
 

Tuesday, December 20, 2011

Tasty Tuesdays: Artisan Bread


Welcome to Tasty Tuesdays!

{ Just a reminder, there will not be a Tasty Tuesday link up next week.  I will be back and ready for you to link up on Tuesday, January 3rd. }

Last week at the library I came across the book Artisan Bread in Five Minutes a Day.  I had heard about the book a long time ago and kept meaning to look for it.


I tried out the basic recipe this weekend and was pleasantly surprised at how easy it was and how delicious the bread is.


The beauty of this method is that one batch of dough makes enough for four small loaves of bread, and the dough will last in the refrigerator for up to two weeks.

Ingredients:
- 3 cups lukewarm water
- 1-1/2 tablespoons granulated yeast (the authors say you can use rapid rise yeast or regular
- 1-1/2 tablespoons kosher or other course salt
- 6-1/2 cups unsifted, unbleached, all-purpose white flour (measure with the scoop-and-sweep method)
- cornmeal for pizza peal

Equipment & Notes:
- plastic container for dough storage, at least 5 quarts.  I used a large, clean, Rubbermaid container.  If I continue to make bread this way, I would like to buy this from King Arthur Flour.  Whatever container you decide to use, the cover should NOT be airtight.  You want the gases to be able to escape from the container.  Just leave the cover open slightly.

- Pizza peel or metal cookie sheet

- Metal baking container - a 9x13 metal brownie pan works well.  This is to use in the oven.  You will add water to this container when you bake the bread to create steam.

- You can mix the dough by hand in the container you plan to store it in or in a heavy duty stand mixer with a dough hook attached.

- Scoop-and-sweep method:  For measuring flour.  Scoop flour out of container with 1 cup measuring cup and level with knife.  DO NOT pack flour into cup.

- Dough can be stored in the refrigerator for up to two weeks.

- If you don't have a 1/2 tablespoon measuring spoon, just measure out 1-1/2 teaspoons.

- The book authors have put together a great video showing the entire process.  Find it right here on their Amazon page.  It is definitely worth watching - makes the process seem very easy.

Directions:
1.  Warm water slightly.  Warm water from the tap is just fine.  Water should not be hot, just warm and slightly above body temperature.  The authors of the book say that you can also use cold water to achieve the same results.  Pour water into stand mixer bowl, or, if you are mixing by hand, your plastic storage container.

2.  Add yeast and salt to the water.  You can stir, but do not worry about getting all the yeast to dissolve.

3.  Measure flour out into another mixing bowl, and then add it all at once to water, salt, and yeast.

4.  Mix in the flour (either by and or with dough hook on stand mixer.  No kneading is necessary.  Only mix until mixture becomes uniform, without any dry patches.  With a dough hook this will not take long.  If using a stand mixer, transfre now to storage container.

5.  Allow dough to rise.  Cover with lid (not airtight) and allow mixture to rise at room temperature for 2 hours.  Dough can be left out at room temperature for as long as five hours with out harming the end result.

6.  Refrigerate.  For the first loaf, dough should refrigerator for at least two hours.

My dough looked like this when I took it out of the refrigerator before baking the first time:


To Bake:
1.  Remove dough container from refrigerator.  Sprinkle flour over part of dough that you plan on using.  Grab a chunk of dough and pull up.  Cut off, either with a pair of kitchen shears, or serrated knife, a grapefruit size portion.

2.  Dust with flour (but do not incorporate) and form ball of dough into a round circle.  Fold over edges of dough to the bottom side.  Dust pizza peel or metal baking sheet with cornmeal and place dough on it.  The authors say that this whole step should only take 30 - 60 seconds. You do not need to work with the dough a lot.  Let dough rise for 40 minutes at room temperature.  It does not need to be covered.


3.  Twenty minutes before baking, preheat the oven to 450 degrees, with a baking stone (pizza stone) placed on the middle rack.  Also, place an empty metal baking container on shelf below stone.

4.  When 40 minutes is up, dust dough with flour and slash with a serrated bread knife.  Either a criss-cross pattern, or scallop pattern.

5.  Transfer dough to pizza stone.  Open oven and quickly jerk your wrist to transfer dough from pizza peel on to pizza stone.  Close oven door.  Run tap until water is hot and measure out one cup of water.  Open oven door again and pour water into metal baking dish.  Quickly close oven door to trap steam.

6.  Bake bread for 30 minutes, or until the crust is nicely brown and firm.  Remove from oven and cool immediately on wire cooling rack.


This bread was so good!  I am really looking forward to making lots more bread like this.  And I love knowing that I have 3 more loaves just waiting to be baked right now.  I am planning on purchasing the book.  There are so many more recipes in the book - everything from pastries to pizzas to flat breads to peasant loaves.  I think this would be a great last minute gift for any baker on your shopping list!


Party Rules:

- Add a link in your post back to this post
or
- Add the Tasty Tuesdays button to your post.  You will find the code on my sidebar.

{ Please follow the party rules for linking up - there are people who link up week after week without including any type of a link back.  I'm not sure why?  If you don't know how, please just ask! }