Pages

Monday, November 25, 2013

Winter Wardrobe Staples & My Name Necklace Review

 
 Recently I was contacted by Sharon of My Name Necklace wondering if I would like to review one of their necklaces.  I selected the Celebrity Monogram Necklace and within a week a lovely little package arrived in the mail for me.
 
 
I opened up the box to discover a beautiful necklace.  I was pleasantly surprised at the quality - I don't know what I was expecting, but the necklace has a nice weight to it and feels substantial.  I'm very pleased with the quality.  I selected the 18K gold plated version of the necklace and I really like the look!
 
 
Look at that shine!
 
 
I've already worn the necklace several times - it works with almost anything!  And who doesn't like their own monogram?  I'm really happy with the necklace, and I wouldn't hesitate to give it as a gift to any of the women in my life.


My Name Necklace is offering readers of 33 Shades of Green a discount coupon.  Just enter code 33SHADES for a 10% discount off of your order.  Just in time for Holiday shopping!
 
I put together a list of my Winter Wardrobe Staples.
 
1.  Wool Coat.  A heavy wool coat is an absolute must here in Michigan during the Winter months.  My personal favorite wool coats are J Crew's Double Cloth Lady Day Coats.  The double cloth is made in Italy (bonus!) and the coats are warm & substantial.  One of my J Crew double cloth coats is 5 years old and still looks brand new!  The double cloth really holds up.  Also love how these coats are perfect when you are dressing up and just as great with jeans and boots.
 
2.  Cardigans.  I love a basic cardigan.  Great for a day at the office or running errands on the weekend.  J Crew Merino Tippi Cardigan.
 
3.  Jewelry.  Every outfit needs a pretty finishing piece.  Celebrity Monogram Necklace by My Name Necklace.
 
4.  Skinny Jeans.  In my opinion, an absolute must.  Perfect for tucking into tall boots yet versatile enough to wear with flats on warmer days.  I like the skinny jeans from gap & Banana Republic the best. 

5.  Leather Boots. I live in my boots all  Winter.  Perfect with skinny jeans or leggings.  I'd love this pair from Frye.

6.  Button Downs.  Casual and so easy to wear.  And of course, I love the green.  Shrunken Boyfriend Gingham Flannel Shirt by Gap.

7.  Leather Bag.  An essential piece to any wardrobe.  I think the Bettina Satchel from Banana Republic is gorgeous.

8.  Scarves.  I don't know about you, but it's rare from me to leave the house without a scarf in the Winter.  I love the Metallic Striped Scarf from Target.  What a bargain!

What's your favorite Winter Wardrobe Staple?

Monday, November 4, 2013

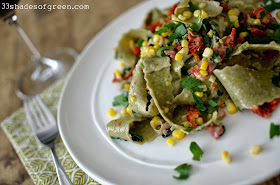
Weekend Kitchen: Pappardelle with Sweet Corn & Gorgonzola

 
Happy Monday, friends.  I miss blogging - It really feels good to sit down at my computer and write a post!  I keep thinking I'll have more time to blog, but there's been so much to do on our new house.  We are moving in less than 7 weeks(!!!) so I think I may finally have free time and would love to get back to this blog again.
 
I made this pasta a month or so ago, and I absolutely loved it.  I loved everything about this pasta - the combination of ingredients together is amazing.  This one is a keeper and definitely will be made again.  Maybe not until next summer though, when Michigan sweet corn is in season.
 
This recipe comes from a very lovely food blog, The Italian Dish.  See her post right here.
 
 
I am a huge fan of The Local Epicurean. pasta.  If you are in the Grand Rapids area, make sure to try their pasta for yourself.


Ingredients:
- 4 ounces dried pancetta (or bacon as a substitute)
- 8 ounces pasta (I thought pappardelle was perfect for this dish)
- 2 tablespoons extra virgin olive oil
- 2 ears of sweet corn, cut off the cob
- salt & pepper
- 3 tablespoons mascarpone cheese
- 3 tablespoons gorgonzola cheese crumbles
- 6 scallions, sliced diagonally
- 2 ounces sun dried tomatoes, julienned
- 1 tablespoon chopped fresh basil
- 1 tablespoon chopped fresh parsley
- 1/2 cup white wine
 
 
1.  Bring a large pot of well salted water to boil for the pasta.
 
2.  Meanwhile, fry the pancetta in a large sauté pan until just done and crispy.  Remove with a slotted spoon and set aside. Do not wipe out the fat from the pan.
 
3.  Boil the pasta and while it is cooking, make the sauce:
Add the olive oil to the pan and sauté the corn and scallions over medium high heat for about 5 minutes.  Season with a little salt (the pancetta will add salt later) and plenty of freshly ground black pepper.  Pour in the wine, cooking for a couple of minutes to let the wine reduce.  Add the cheeses and whisk gently until they are smooth and well incorporated.  Mix in pancetta, basil, parsley and tomatoes.  Taste for salt and add more if needed.  Place a lid on the pan, turn off the heat and let steep for a minute or so.  
 
Drain the pasta and add to the pan and toss well. 
 
Enjoy!


Monday, September 16, 2013

A Quilt for Baby Charlie

 
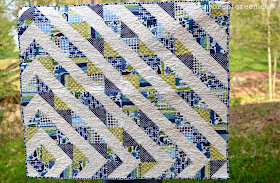
When one of my best friends was pregnant, and found out she was having a boy, I got to work sewing him a baby quilt.  I already had some of the boy themed fabric and couldn't wait to use it.
 
This Alexander Henry print with the animals is one of my favorites.  Isn't it darling?
 
 
I didn't have a pattern for this quilt, but the idea came from this one by Kelly of Irene Design that I have pinned on Pinterest.  I figured out the size I wanted for my finished quilt, and worked backwards from there to figure out what size squares to cut.  I ended up using 4-1/2" squares for a finished quilt size of 35" x 42".  If you are looking for an easy way to make triangles for a quilt like this, follow this method.  So easy!
 
 
I started by laying out the squares in a pattern that looked good, and then sewed the rows together, left to right.  Once all the vertical rows were sewed, I sewed the horizontal rows together. 
 
 
The view from my sewing table at the rental house as I was sewing this last spring. 
 
 
I didn't finish the quilt before the baby was born, so baby Charlie got his initials embroidered on the back of the quilt.  I love that I was able to incorporate them.
 
 
And the finished quilt...


I really love making quilts for babies - there is something special about sewing for a new little one.  See my other baby quilts here and here.
 
Hopefully, Baby Charlie will love his quilt as much as I loved making it. 

Tuesday, May 28, 2013

Tasty Tuesdays: Summer Vacation


I've decided to put the Tasty Tuesday link up party on Summer vacation.  I have too much going on this Summer to keep up with blogging.  I hope you understand!  I hope to see you back here in the Fall.  Enjoy your Summer!
 
{ Photos from last years Lake Michigan vacation.  See it here }


Tuesday, May 14, 2013

Tasty Tuesdays: Coconut Lime Bars

 
 Welcome to Tasty Tuesdays!
 
On Sunday, my sister and I had our Mom over for dinner for Mother's Day.  For dessert, I made these delicious lime bars.  My Mom & I thought they were delicious.  My sister isn't a huge key lime fan, so her favorite part was the crust.
 
{ Original recipe from Martha Stewart Living.  Find it here. }
 
Ingredients:
Crust:
- 6 tablespoons cold unsalted butter, cut into 1/2-inch pieces, plus more, softened, for pan
- 3/4 cup all-purpose flour
- 3 tablespoons light-brown sugar
- Rounded 1/4 teaspoon coarse salt
- 1/2 cup finely shredded unsweetened coconut
- 3 ounces white chocolate, coarsely chopped (about 1/2 cup)
 
Filling:
- 3 large eggs, room temperature
- 2/3 cup granulated sugar
- 3 tablespoons all-purpose flour
- 2/3 cup fresh Key lime juice or regular lime juice
- 1 tablespoon confectioners' sugar, for dusting
 
 
Directions:
 
1.  Crust: Preheat oven to 400 degrees. Lightly butter an 8-inch square baking pan. Line bottom and 2 sides of pan with parchment, leaving a 1-inch overhang; lightly butter the parchment.
 
2.  Combine flour, brown sugar, and salt in a medium size bowl and stir until combined. Add butter; use a pastry blender until largest pieces are the size of peas. Add coconut and white chocolate, and combine, just until mixture holds together. Transfer mixture to pan, and pack down firmly with the bottom of a measuring cup. Bake until crust is deep golden brown, 18 to 20 minutes. Remove from oven, and reduce heat to 300 degrees.
 
3.  Filling: Whisk together eggs and granulated sugar in a bowl, then whisk in flour. Gently stir in lime juice (do not whisk or stir vigorously or batter will become foamy).
 
4.  Pour filling over hot crust, and bake until filling is set, about 15 minutes. Let cool completely on a wire rack.
 
5.  Run the tip of a knife along the 2 sides of the pan not lined with parchment, then remove from pan by lifting with parchment overhang. Transfer to a cutting board, dust with confectioners' sugar, and cut into 1-inch squares.


What did you cook this week?

Party Rules:
1.  Add a link to the post you are linking up back to this post
OR
2.  Add the Tasty Tuesday button to the post you are linking up.  You will find the button and code on my sidebar.  Thanks!


Tuesday, April 30, 2013

Tasty Tuesdays: Pesto Pizza with Arugula & Goat Cheese


Welcome to Tasty Tuesdays!
 
This is my new favorite pizza - it is delicious.  My sister and I made up this pizza a month or so ago and made it again this weekend.  We love it.

 
Ingredients:
- Prepared pizza dough (instead of making our own, we used a ball of frozen dough from the grocery store)
- 3 oz. pesto (we used a jar from the grocery store)
- Olive oil
- Garlic powder, salt, and ground black pepper to taste
- 1/2 red bell pepper, diced
- 1/4 cup kalamata olives, chopped
- 1/4 cup goat cheese crumbles
- 1/4 cup fresh mozzarella, cut into pieces
- 1 large handful arugula leaves
- 1 lemon, cut in half

 
1.  Pre-heat oven to 450 degrees.  Prepare pizza dough according to package instructions or recipe.  Roll out dough to desired size - 14" round works well for this recipe.  Place dough on pizza stone or cookie sheet and sprinkle with olive oil, garlic powder, salt and pepper.  Bake in oven for 4 - 6 minutes.  Remove from oven.
 
2.  Spread pesto evenly around crust.  Top with peppers, olives, and both cheeses.  Bake for 12 - 15 minutes or until slightly browned.  Remove from oven and immediately top with handful of arugula leaves.  Squeeze 1/2 of lemon evenly over pizza (you may not need all the juice from the 1/2 of lemon; just squeeze to taste!)
 
3.  Slice pizza and serve immediately.

 
The flavors of this pizza are so good together.  We served this with fresh Italian sausage on the side to round out the meal.  And of course, a little red wine as well.  What good Italian doesn't enjoy a little vino with dinner?


What did you cook this week?
 
Party Rules:
1.  Add a link to the post you are linking up back tot his post
OR
2.  Add the Tasty Tuesday button to the post you are linking up.  You will find the button and code on my sidebar.  Thanks!